Team blogs are quite useful when small groups of people wish to
contribute to a single blog. Basically, one person initially creates the
blog, then adds other people to it as members.
Create a team blog
Team members can either be administrators
or not. Administrators can edit all posts (not just their own), add and
remove team members (and grant admin access), and modify the blog's
settings and template. Non-admins can only create and edit their own
posts.
Here's how to add members to your blog:
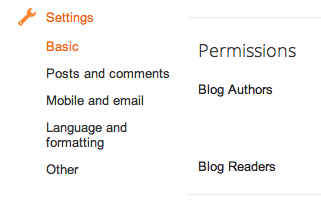
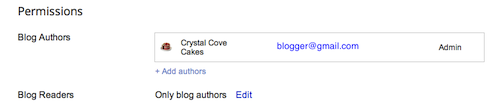
First, find the "Permissions" section under Settings | Basic.
Then click Add Authors:
Next, type the email addresses of the people you're inviting to the
blog, separating each address with a comma. They'll receive an email
with a confirmation link soon. Note that they must have Google Accounts,
and if they don't already, they'll be prompted to create one.
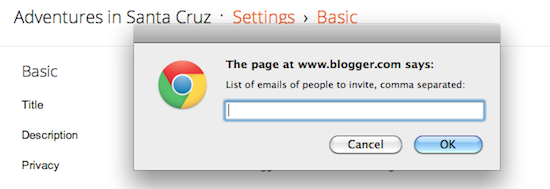
When you're ready to send the invitations, click OK.
Remove a team member
To remove a team member, go to the Settings | Basic tab and click the X next to the name of person you want to remove:
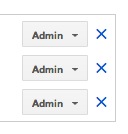 While this will prevent the removed team member from creating
additional posts, it will not remove items previously posted by them.
While this will prevent the removed team member from creating
additional posts, it will not remove items previously posted by them.
Remove yourself from a team blog
To remove yourself from a team blog, navigate to the Settings | Basic
tab for the appropriate blog. If you're an admin member, you'll see a
full listing of team members there. Just find your name and click the X next to it.
If you don't have admin rights on the blog, you will see a simpler page, with a Remove yourself from this blog link. Clicking this link will remove you from the blog.
If you remove yourself, your previous posts will still appear on the blog, but you will not be able to make new posts. The blog will no longer appear on your Dashboard or in your profile.
If you remove yourself, your previous posts will still appear on the blog, but you will not be able to make new posts. The blog will no longer appear on your Dashboard or in your profile.
Comments
Post a Comment